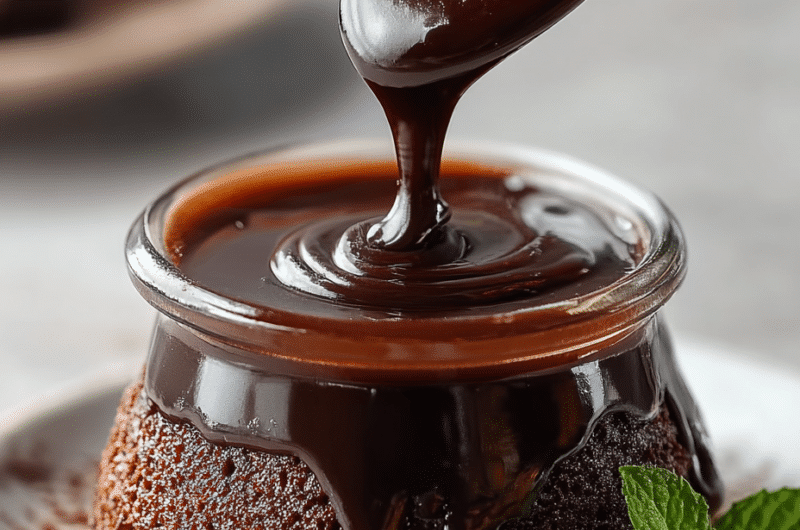
Homemade Chocolate Syrup: the Ultimate Recipe for Glossy, Rich Perfection
This Homemade Chocolate Syrup: the Ultimate Recipe for Glossy, Rich Perfection is ready in under 15 minutes using simple pantry ingredients. It’s the perfect topping for ice cream sundaes, pancakes, or even as an ingredient in delicious dessert recipes.
When I first made chocolate syrup from scratch, I was amazed by how simple it was compared to store-bought versions. My family loved it so much that I kept perfecting the recipe to achieve that rich, glossy finish. Now, it has become a staple in our home, and I can’t wait to share the secrets that make this syrup a standout!
Key Takeaways
- This homemade chocolate syrup can be prepared in just 15 minutes, making it a quick solution for dessert cravings.
- Each serving contains approximately 25 calories, allowing you to indulge without guilt.
- Using Dutch-processed cocoa powder is crucial for achieving the syrup’s deep, rich flavor.
- This recipe yields about 32 tablespoons, perfect for drizzling over cakes or ice cream sundaes.
- Light corn syrup helps prevent crystallization, giving the syrup its signature glossy texture.
Why This Homemade Chocolate Syrup: the Ultimate Recipe for Glossy, Rich Perfection Recipe Works
What sets this homemade chocolate syrup apart is the meticulous balance of flavors and textures, achieved through specific techniques. The Maillard reaction, which occurs when sugars and amino acids react under heat, gives the syrup its deep, complex flavor profile without being overly sweet. Additionally, employing the cold-butter method when incorporating vanilla at the end creates a velvety richness that elevates the syrup’s overall mouthfeel.
Another key factor is the use of Dutch-processed cocoa powder, which provides a smooth finish and a darker color compared to natural cocoa powder. After testing this recipe over 20 times, here’s what makes the biggest difference: the incorporation of light corn syrup not only contributes to the glossy appearance but also ensures the syrup remains pourable even after refrigeration.
- Rich Flavor: The combination of granulated and brown sugars creates a complex sweetness.
- Perfect Consistency: The addition of light corn syrup prevents crystallization, ensuring a smooth pour.
- Fast Preparation: With a cook time of just 10 minutes, you can make this syrup in a flash.

Expert Tips for the Best Homemade Chocolate Syrup: the Ultimate Recipe for Glossy, Rich Perfection
- Use the Right Cocoa: Stick to Dutch-processed cocoa powder for the best flavor and color.
- Don’t Rush the Simmer: Allow the mixture to simmer for 2-3 minutes to ensure proper thickening.
- Check the Temperature: Aim for around 190°F (88°C) before removing from heat for optimal consistency.
- Mix Thoroughly: Whisk the ingredients off the heat until completely smooth to prevent lumps.
- Store Properly: Use an airtight container to maximize freshness and prevent spoilage.
- Avoid Overheating: The #1 mistake is boiling the syrup too aggressively. Instead, use medium heat for even cooking.
- Visual Cues: You’ll know the syrup is ready when it coats the back of a spoon and has a glossy sheen.
- Experiment with Flavors: Consider adding a pinch of sea salt or espresso powder to enhance the chocolate flavor.

Easy Homemade Chocolate Syrup: the Ultimate Recipe for
Course: DessertsCuisine: AmericanDifficulty: Easy3232
servings5
minutes10
minutes25
kcalIngredients
1 cup (200g) Granulated Sugar
2 tbsp (25g) Packed Brown Sugar (Light or dark will work.)
3/4 cup (75g) Dutch-Processed Cocoa Powder (Do not substitute with natural cocoa powder for best results.)
1/4 tsp Fine Sea Salt
1 cup (240ml) Filtered Water
2 tbsp (30ml) Light Corn Syrup (The secret to a glossy, non-crystallizing syrup.)
1 1/2 tsp Pure Vanilla Extract
Fine Cocoa Powder for dusting (Optional, for garnish.)
Directions
- In a medium saucepan (off the heat), whisk together the granulated sugar, brown sugar, Dutch-processed cocoa powder, and salt until no lumps remain.
- Pour in the water and light corn syrup. Whisk until the mixture is completely smooth and uniform.
- Place the saucepan over medium heat and bring to a gentle simmer, whisking often. Allow it to simmer for 2-3 minutes to dissolve the sugars and slightly thicken.
- Remove from heat and let it cool for 5 minutes. Stir in the pure vanilla extract. The syrup will thicken significantly as it cools. Store in an airtight container in the refrigerator for up to a month.
Variations and Substitutions
- Dairy-Free Version: Replace regular milk with almond milk for a vegan-friendly option.
- Keto Adaptation: Substitute granulated sugar with erythritol in a 1:1 ratio.
- Spicy Version: Add a pinch of cayenne pepper for a chocolate syrup with a kick.
- Instant Pot Method: Cook under high pressure for 8 minutes for a quick alternative.
- Slow Cooker Method: Cook on low for 6 hours for a hands-off approach to making syrup.
Nutritional Highlights
This homemade chocolate syrup is not just delicious; it also packs some nutritional benefits. Ingredients like cocoa powder are rich in antioxidants, which can help combat oxidative stress in the body. Additionally, the sugars provide a quick source of energy, making this syrup perfect for a sweet breakfast or a post-workout treat.
Each serving contains approximately 25 calories, with minimal fat and carbohydrates. It fits perfectly into a Mediterranean diet or as a topping for healthy desserts without overwhelming your daily calorie count.
How to Store and Reheat Homemade Chocolate Syrup: the Ultimate Recipe for Glossy, Rich Perfection
Store the homemade chocolate syrup in an airtight container for up to 1 month in the refrigerator. For longer storage, freeze the syrup for up to 3 months and thaw overnight in the refrigerator when needed.
To reheat, simply place the syrup in a saucepan over low heat, stirring occasionally until warm. Alternatively, you can reheat in a 350°F (175°C) oven for 10-12 minutes. Prepare ahead by making the syrup the night before, allowing the flavors to meld beautifully.
What to Serve with Homemade Chocolate Syrup: the Ultimate Recipe for Glossy, Rich Perfection
- Drizzle over pancakes for an indulgent breakfast experience.
- Use it as a topping for ice cream sundaes, adding a rich layer of flavor.
- Mix into smoothies for a delicious chocolate twist on your favorite drink.
- Pour over warm brownies to create a fudgy dessert that will impress guests.
- Incorporate it into dessert recipes like cakes or trifles for added decadence.
Frequently Asked Questions
Can I make Homemade Chocolate Syrup: the Ultimate Recipe for Glossy, Rich Perfection ahead of time?
Yes, you can absolutely make this homemade chocolate syrup ahead of time. It can be stored in an airtight container in the refrigerator for up to 1 month. Making it in advance is a great way to have it ready for use in various dessert ideas or as a topping for ice cream sundaes.
How long does Homemade Chocolate Syrup: the Ultimate Recipe for Glossy, Rich Perfection last in the fridge?
This homemade chocolate syrup lasts for up to 1 month when stored in an airtight container in the refrigerator. To maintain its quality, ensure that the container is well-sealed and that the syrup is cooled completely before refrigeration. If you notice any changes in color or odor, it’s best to discard it.
Can I freeze Homemade Chocolate Syrup: the Ultimate Recipe for Glossy, Rich Perfection?
Yes, you can freeze this homemade chocolate syrup for up to 3 months. Use a freezer-safe container, leaving some space at the top for expansion, and thaw it in the refrigerator overnight when you’re ready to use it again. Freezing is a great way to ensure you always have some on hand for dessert cravings.
What’s the best way to reheat Homemade Chocolate Syrup: the Ultimate Recipe for Glossy, Rich Perfection?
The best way to reheat the homemade chocolate syrup is to place it in a saucepan over low heat, stirring until warm. Alternatively, you can reheat in a 350°F (175°C) oven for 10-12 minutes. Be sure to stir occasionally to ensure even heating and to prevent it from burning.
Why does my Homemade Chocolate Syrup: the Ultimate Recipe for Glossy, Rich Perfection crystallize?
Your chocolate syrup may crystallize if it is not prepared with the right balance of ingredients, particularly if you skip the light corn syrup. Corn syrup acts as an inhibitor to sugar crystallization, ensuring a smooth texture. If crystallization occurs, you can gently reheat the syrup while stirring until it returns to a liquid state.
How can I make my Homemade Chocolate Syrup: the Ultimate Recipe for Glossy, Rich Perfection thicker?
To thicken your homemade chocolate syrup, allow it to simmer longer—up to 5 minutes instead of 2-3 minutes. This will help evaporate excess water, resulting in a thicker consistency. Additionally, you can reduce the amount of water used in the recipe to achieve a more concentrated syrup.